Hardware Heaven, Pattern Hacks
Stand Up & Tote Notice Pattern Hack – Key Hook

A few days ago I released this great pattern hack for adding an inner zipper pocket to your Stand Up & Tote Notice bag. It had me thinking about other features I could include to really take this bag to the next level. I didn’t have to think long before I realised this was the perfect opportunity to solve the greatest pet peeve of handbag lovers the world over: The Lost Key Shuffle. Yes…before you lies the answer to all of your late night “I know they’re in here. Just bear with me. They’re right at the bottom. EW! What did I just touch?”, keys-lost-in-the-bottom-of-the-handbag dilemmas.
To add a key hook to your Stand Up & Tote Notice bag, you will need:
- A piece of fabric measuring 3” x 6” (8cm x 15.25cm)
- A piece of light-medium weight fusible interfacing (such as SF101) measuring 1 1/2” x 6”
- A swivel hook size 5/8” (16mm)
If you’re yet to grab your copy of the Stand Up & Tote Notice pattern, you can find it here.
Work through steps 1 – 11 of the pattern and then continue below…
Take your fabric and fold it in half with wrong sides together, matching long sides. Press. Open it out and fold each side into the middle and press (like double fold bias tape).
Open out and place the piece of interfacing along the middle of the strip of fabric in the channel you’ve just made.
Fold the sides of the fabric back over to ensure the interfacing is in the middle and then fuse well. Fold the fabric in half again and press well.
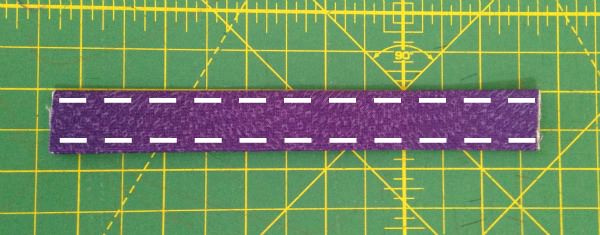
Stitch, using a 1/8” (0.3cm) seam allowance, down the open side of the strap to close and also down the folded side.
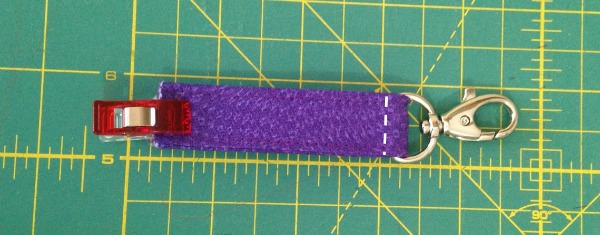
Feed the strap through the loop of your swivel hook and fold it in half, matching raw ends.
Stitch to secure using a ¼” (0.6cm) seam allowance in from the fold. A zipper foot can help you get in close to the swivel hook.
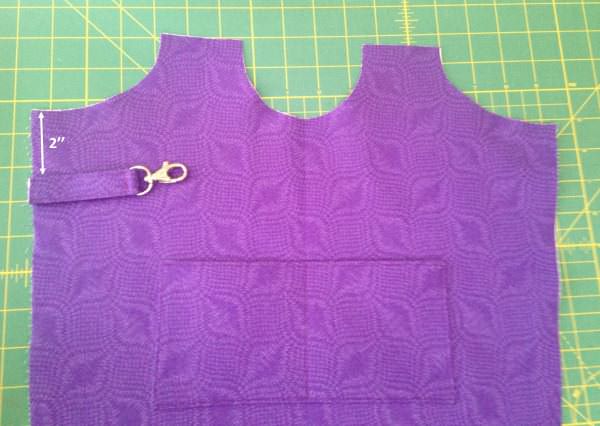
Take one of your Stand Up & Tote Notice lining panels and position your swivel hook loop 2” down from the top edge along one side. Ensure the swivel hook loop is on the right side of the lining panel and facing into the middle of the panel. Stitch in place using a 1/4” (0.6cm) seam allowance. Keys can be heavy so I recommend stitching back and forth over the swivel hook loop a few times to ensure it is secure.
From here, continue with the Stand Up and Tote Notice pattern from step 12.
When you are placing the lining panels with right sides together in step 12, ensure the swivel hook loop is still sitting on the right side of the lining panel and facing into the middle of the panel. When you sew the side seams, be sure to stitch back and forth over the swivel hook loop to really secure it in place.
You can, of course, make your swivel hook loop longer or shorter to suit your needs. Take care, though, that you can can still easily take the keys off the hook.
There you have it. This handy little key hook means I now know where my keys are at all times. HOORAY.
Now…where did I put my pen???
You’re welcome to share photos of your creations in my patterns group on Facebook, with my Facebook Page or even tag me on Instagram!
As always, if you have any questions please feel free to comment below or contact me via the Contact page and until next time, happy sewing!
Lisa x


Could you create a hack to add a zipper closure for the top?
Hi Carol! Thanks for your comment. At this stage I don’t have plans to write a hack for adding a recessed zipper closure, however I think someone in my patterns group on Facebook has added one to their Stand Up Tote. You can find the group here. Feel free to ask in the group (I can’t recall their name off the top of my head sorry!). Cheers, Lisa 🙂
Pingback: Hardware Heaven: Swivel Hooks and Sliders - Andrie Designs formerly Two Pretty Poppets